Installing a garage door opener is definitely something that a do-it-yourselfer can save significant money on, if it doesn’t get screwed up. Luckily, it’s usually pretty easy to do a clean, sturdy installation, and save $300+ in the process. Here are a few tips regarding common mistakes, and ways to save time and money on your installation.
Make Sure Your Door Works Before You Start
There is not point in putting a brand new opener on a door that doesn’t work right, it will just make matters worse. Disconnect the door from it’s existing opener if it has one, and operate it manually. Be sure that your door can be opened and closed with one hand, and will hold itself still (or slowly creep down) when positioned waste high.
Do not let the door fly up hard. You see people do this with large commercial doors that are specifically designed for this type of use, your typical residential door is not. This is a common way to make the cables dump off of the drums, causing a crooked, jammed door.
Measure the Height of Your Door
There is nothing worse than finishing what seemed to be a perfect opener installation only to find out that your door doesn’t open all the way. Most openers that you buy in a store or from Amazon are meant for seven foot tall (or under) garage doors. You must buy the extension kit if your door is taller than seven feet, and there is no store bought option for taller than eight feet.
What Kind of Opener are you Replacing?
You may be able to make your life a lot easier by replacing your existing opener with the same brand and model. If you are replacing a LiftMaster/Chamberlain/Sears-Craftsman opener, select the same thing again(Chamberlain is the parent company and manufactures all three brands. They are virtually identical, but may be packaged and labelled differently). The main competitors to these common openers are Genie/Overhead Door, same situation.
Both manufacturers have been putting out the same basic products since the 1980’s. This means that you may not have to change anything with the hangs and possibly the safety eyes–huge time savings. Especially if you are working without an impact gun.
Reuse the Safety Eyes if Possible
If you are installing a new opener from the same manufacturer as your old one, the old safety eyes might work just fine, and there is no harm in trying. Try leaving them in place, and keep the new ones handy in case the old ones fail.
Get the Spacing Right
When your garage door is open, the opener rail should be close to the top edge of the door, about 2″ is ideal. The higher it is, the more it will cause the arm to push down on the top section, instead of forward. This can bend and crack the top of your door. On lightweight doors, the rail should be no more than 5″ above the door. Stronger doors that operate smoothly can handle up to 10″ of space, but any more is unacceptable.
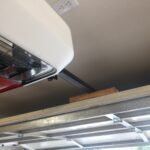
Use the Open Door to Help You
Getting the new opener maneuvered into place can be a challenge. Luckily, there’s a trick the pros use.
Carefully open your door all the way to the top. Push it up to the point where you have enough space to comfortably reach your arm up between the bottom edge of the door and the header to access the wall mount. Lock the door into place by clamping a vice grip onto the track, snug to the bottom roller so as to prevent the door from moving downward. You can now rest the assembled opener on the door while you attach it to the wall mount and back hangs.
Save Big on Hanging Material
Pre-punched angle iron is expensive, and can add up to $50 onto an installation that requires long hangs. A great alternative is to use conduit for the vertical hangs (but not the ceiling mount, you should still use punched angle iron there). Measure and cut, then flatten the ends with a hammer(don’t forget to rotate the conduit 90 degrees on the second end you flatten). Drill a 1/2 ” hole in each end to accommodate a bolt.
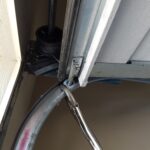
Install the Safety Eyes Properly
Don’t be one of these yahoos that goes and puts the safety eyes in a place there they don’t do any good. They can be annoying (especially if they are mounted all loose and move around all the time), but safety eyes do prevent a lot of injuries to people and pets, as well as expensive door and vehicle damage. They should be installed near the bottom corner of each door, 6 inches above the floor or lower.
Lots of people don’t install the safety eyes in the proper place because there is high concrete right next to the door track, which would seem to require drilling into concrete. But there is a second option: glue the safety eye brackets to the floor with strong glue. Clean the spot well, apply adhesive, and use a piece of gorilla tape to hold in place until the glue sets. Easy.
Do Not Exceed the Proper Force Setting
Do not turn the force setting up too high, especially if you are having trouble getting it to work. Chamberlain made openers with manual force dials should never be turned above 5. Genie doesn’t label their dials the same way, but do not go turning it more than half way. Luckily, most new openers have digital force settings that cannot be turned up to an unsafe level.
If your new opener won’t operate your door when set at the proper force sensitivity, there is something wrong with your door.